
Learning to play the oboe can be both exciting and challenging for beginners. This double-reed woodwind instrument produces a distinctive, melodious sound that enriches orchestras and ensembles. Many aspiring musicians wonder how to create their first notes on this intricate instrument.
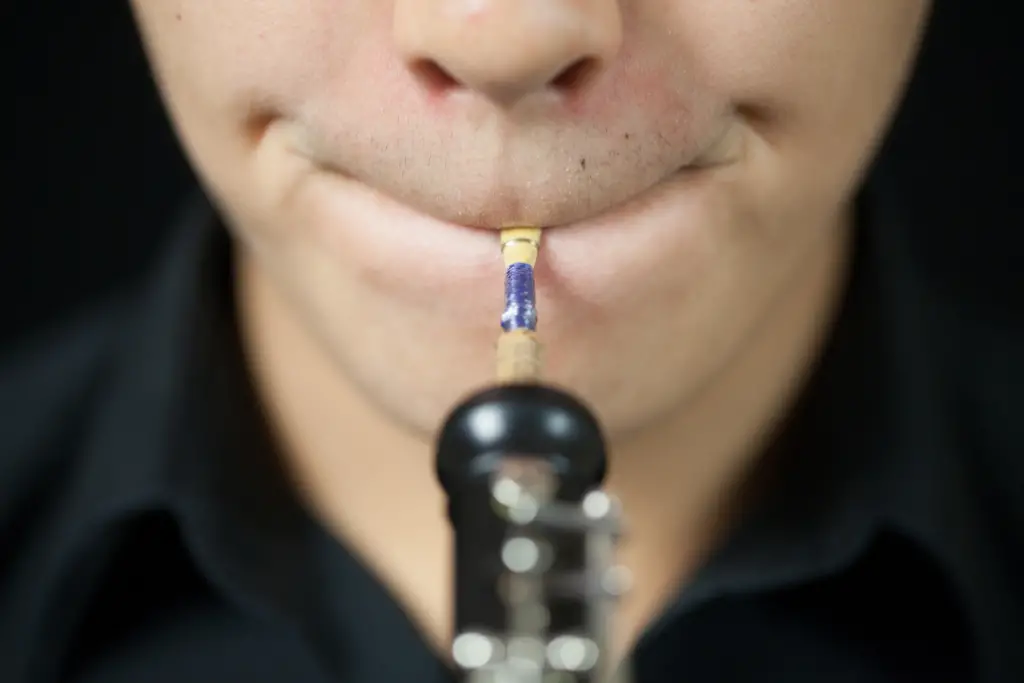
To make your first sound on the oboe, start by forming the correct embouchure. Bring your lips together as if you’re whistling, with your lips slightly pursed and in front of your teeth. This mouth position is crucial for producing a clear tone. Once the embouchure is set, place the reed between your lips and blow a steady stream of air.
Beginners may initially produce a sound resembling a “caw” or squeak when blowing into the reed. This is normal and with practice, the sound will become more refined. As skills develop, players can explore the first few notes, typically starting with B, A, and G, which form the basis for simple melodies like “Hot Cross Buns.”
Understanding the Oboe
The oboe is a complex woodwind instrument with a distinctive sound. Its unique construction and assembly require careful attention to detail for proper playing.
Anatomy of the Oboe
The oboe consists of three main parts: the upper joint, lower joint, and bell. The upper joint contains the octave key and left-hand keys. The lower joint houses the right-hand keys and connects to the bell.
At the top of the instrument sits the reed, a crucial component for sound production. The reed is made of two thin pieces of cane bound together, creating a small opening for air to pass through.
Keys and tone holes along the body allow players to produce different pitches. The oboe typically has a range of about two and a half octaves, from B-flat below middle C to F or G above the staff.
Assembly of the Instrument
Proper assembly is crucial for the oboe’s functionality and longevity. Begin by applying cork grease to the tenons, which are the connecting points between sections.
Gently twist the upper and lower joints together, aligning the bridge key. Avoid applying pressure to the keys during this process.
Next, attach the bell to the lower joint, again using a gentle twisting motion. Ensure all connections are secure but not overly tight.
Finally, insert the reed into the top of the upper joint. Handle the reed with care, as it is delicate and essential for sound production.
Always assemble the oboe with clean, dry hands to prevent moisture damage and maintain the instrument’s condition.
Basic Embouchure Formation
Forming a proper embouchure is crucial for producing a clear, resonant sound on the oboe. The embouchure involves precise lip positioning and controlled breathing techniques.
Lip Position
Creating the correct vowel shape with the mouth is essential for a proper oboe embouchure. Players should form an “ooooh” shape, similar to saying “Winnie the Pooh.” This action brings the corners of the mouth forward.
The top lip should slightly curl around the upper teeth, resembling a drawstring bag. The bottom lip forms a cushion for the reed to rest on.
Avoid clamping down on the reed. Instead, think of gently embracing it with the lips. The embouchure should be round rather than flat, allowing the reed to vibrate freely.
Breathing Techniques
Proper breathing is vital for controlling sound and dynamics on the oboe. Players should breathe from the diaphragm, expanding the lower abdomen when inhaling.
Exhaling should be steady and controlled, providing consistent air support. This helps maintain a stable pitch and tone quality.
Coordinating breath with embouchure is key to producing a rich, expressive sound throughout the oboe’s dynamic range. Players should practice long tones to develop breath control and endurance.
It’s important to avoid tension in the throat or chest while breathing. Relaxed, open airways contribute to a fuller, more resonant sound.
First Sounds
Creating your initial sounds on the oboe requires proper technique and patience. The key is to focus on developing a stable tone and producing clear notes.
Producing a Stable Tone
To produce a stable tone on the oboe, start by surrounding the reed with your lips and forming a tight seal. Exhale steadily through the reed, directing the air into the instrument. Maintain consistent breath support to achieve a continuous sound.
It’s important to keep the embouchure firm but not overly tight. Players should aim for a balanced pressure that allows the reed to vibrate freely.
Experiment with different amounts of reed in the mouth to find the sweet spot for optimal tone production. Typically, about 1/4 inch of the reed should be visible above the lips.
Note Production
Once a stable tone is achieved, players can move on to producing specific notes. Begin with simple fingerings, such as the middle C or G. Place fingers on the appropriate keys and blow steadily through the reed.
Start with long, sustained notes to develop control and consistency. As comfort grows, practice transitioning between different notes smoothly.
Pay attention to intonation by listening carefully and making small adjustments to embouchure or breath support as needed. Using a tuner can be helpful for beginners to ensure accurate pitch.
Regular practice of scales and simple melodies will help improve note production and finger coordination. Gradually increase the tempo and complexity of exercises as skills develop.
Posture and Hand Position
Proper posture and hand position are crucial for producing quality sound on the oboe. Maintaining the correct body alignment and finger placement allows for better control and comfort while playing.
Holding the Oboe
The oboe should be held at a 45-degree angle away from the body. Players should tilt the instrument slightly outward, with the keys facing away from them. This positioning enables optimal air flow and reed vibration.
When seated, musicians should sit up straight with their feet flat on the floor. The back should be away from the chair, promoting an open chest and relaxed shoulders. This posture allows for deeper breathing and better support.
Standing players should distribute their weight evenly on both feet, keeping knees slightly bent. The head should remain level, with the chin parallel to the ground. This stance provides stability and flexibility while playing.
Finger Placement
Correct finger placement is essential for accurate note production and smooth transitions between keys. The left hand should be positioned at the top of the instrument, with the right hand below.
Left hand placement:
- Thumb rests on the thumb rest
- Index finger on the first key
- Middle and ring fingers on the next two keys
- Pinky finger curved over the side keys
Right hand placement:
- Thumb supports the instrument from underneath
- Index, middle, and ring fingers cover the lower keys
- Pinky finger rests on or near the lower side keys
Fingers should be curved and relaxed, with fingertips covering the center of each key. This positioning allows for quick and precise movements between notes. Players should practice bringing the oboe to this position until it feels natural and comfortable.
Caring for Your Oboe
Proper maintenance and handling are crucial for preserving your oboe’s quality and longevity. Regular cleaning and careful reed management will ensure optimal performance and extend the instrument’s lifespan.
Daily Maintenance
Swab your oboe after each playing session to remove moisture. Use a soft, lint-free cloth or a specially designed oboe swab. Gently pull it through each section of the instrument.
Clean the keys with a soft, dry cloth to remove fingerprints and oils. Be careful not to apply pressure on delicate mechanisms.
Store your oboe in its case when not in use. This protects it from dust, temperature changes, and accidental damage.
For wooden oboes, oiling is essential. New instruments may need oiling three times in the first year, decreasing frequency in subsequent years. Follow manufacturer guidelines for specific oiling schedules.
Handling Reeds
Soak reeds in clean water for 1-2 minutes before playing. Avoid using saliva, as it can damage the reed over time.
After playing, gently wipe the reed and store it in a ventilated reed case. This prevents mold growth and extends reed life.
Rotate between multiple reeds to prevent overuse and maintain consistent quality. Replace reeds regularly, typically every 2-4 weeks for beginners.
Avoid touching the reed tip with your fingers. Handle reeds by the cork or string-wrapped section to prevent damage to the delicate playing surface.
Practice Tips
Consistency is key when learning to make sounds on the oboe. Set aside dedicated practice time each day, even if it’s just 10-15 minutes.
Start with reed-only exercises to develop embouchure control. This helps build the foundation for proper sound production.
Use a mirror while practicing to observe proper posture and embouchure formation. This visual feedback is invaluable for beginners.
Focus on breath support. Practice deep breathing exercises to improve air control and sustain notes longer.
Keep the reed moist by soaking it in water before playing. A dry reed makes sound production more challenging.
Experiment with different reed strengths to find what works best. Softer reeds are often easier for beginners.
Record practice sessions to track progress and identify areas for improvement. This allows for objective self-assessment.
Be patient and persistent. Producing a clear sound on the oboe takes time and consistent effort.
Practice in short bursts to avoid fatigue. Rest periods are crucial for maintaining proper embouchure and avoiding bad habits.
Seek feedback from experienced players or instructors. They can provide valuable insights and correct any developing issues early on.
Troubleshooting Common Issues
When starting out on the oboe, players may encounter several challenges. Addressing these issues promptly can improve sound quality and playing experience.
Tuning Problems
Oboes are sensitive instruments, and tuning can be tricky for beginners. If notes sound flat, try pushing the reed further into the instrument. Conversely, if notes are sharp, pull the reed out slightly.
Temperature changes can affect tuning. Allow the oboe to warm up before playing. In cold conditions, the instrument may play flat, while in warm conditions, it may play sharp.
Check that all keys are properly closed. Leaking pads can cause tuning issues. If problems persist, consult a qualified instrument repair technician.
Reed Adjustments
The reed is crucial for oboe sound production. A reed that’s too stiff can make playing difficult and affect pitch. Soften it by gently squeezing the tip with clean fingers.
If the reed is too open, close it slightly by pressing the sides together. For a reed that’s too closed, carefully separate the blades at the tip.
Water in the reed can cause gurgling sounds. Remove excess moisture by gently tapping the reed on a soft surface or using cigarette paper to absorb water.
If adjustments don’t solve the issue, consider replacing the reed. Fresh reeds often provide better sound quality and easier playing.