
Keeping a piccolo clean is essential for maintaining its sound quality and longevity. This small but mighty instrument requires regular care to prevent buildup of moisture, dirt, and debris that can affect its performance. To clean a piccolo, use a cleaning rod with a soft cloth to swab the inside of the instrument after each use, and gently wipe the exterior and keys with a polishing cloth.
Different types of piccolos may require slightly different cleaning approaches. Plastic piccolos are relatively low-maintenance, needing only interior cleaning and polishing of the metal keys. Wood piccolos, on the other hand, demand more attention and care to protect the delicate wooden body from damage due to moisture or temperature changes.
For a thorough cleaning, players can use specialized tools like small brushes to remove dust from under the key mechanisms. It’s also important to lubricate the tenon cork with cork grease to ensure a proper seal and easy assembly. By incorporating these cleaning habits into their routine, piccolo players can keep their instruments in top condition for years to come.
Understanding Your Piccolo
The piccolo is a compact woodwind instrument with unique characteristics and maintenance needs. Proper care requires knowledge of its materials and structure, as well as awareness of common issues that may arise.
Materials and Structure
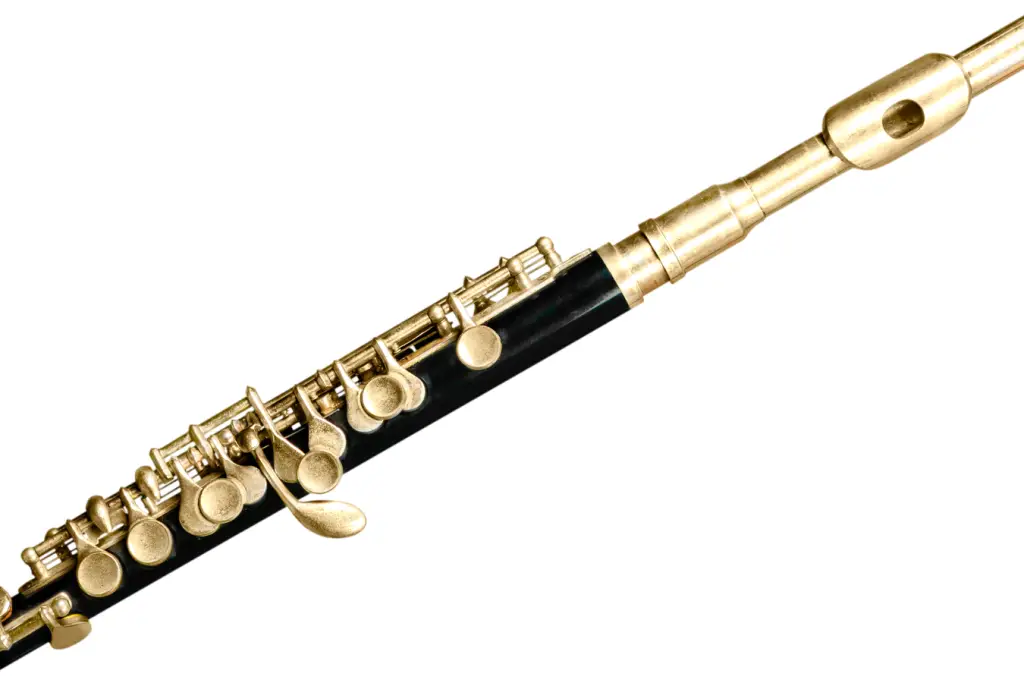
Piccolos are typically made of wood, metal, or plastic. Wood piccolos, often crafted from grenadilla or cocobolo, produce a rich, warm tone but require extra care. Metal piccolos, usually silver or gold-plated, offer durability and a brighter sound. Plastic models are affordable and low-maintenance.
The instrument consists of three main parts: the headjoint, body, and cork at the top of the body. The headjoint contains the embouchure hole, where the player blows air. The body houses the keys and tone holes. Some piccolos feature a split E mechanism for improved intonation.
Common Piccolo Maintenance Needs
Regular cleaning is essential for piccolo maintenance. After each use, players should swab the interior to remove moisture and prevent pad damage. A cleaning rod with cloth is ideal for this task.
Key mechanisms require occasional oiling to ensure smooth operation. Players should apply a small amount of key oil to moving parts every few months. The cork joints need periodic greasing to facilitate assembly and prevent damage.
Pad replacement is necessary when pads become worn or damaged. Professional repair technicians should handle this task to ensure proper seal and intonation. Wood piccolos may need oiling to prevent cracking, especially in dry climates.
Preparing for Cleaning
Proper preparation is crucial for effectively cleaning a piccolo. The following steps outline the essential tools needed and the correct way to disassemble the instrument.
Gathering Essential Tools
To clean a piccolo, gather a cleaning rod with a soft cloth attached. This specialized tool helps reach inside the instrument’s narrow bore. Obtain cleaning paper for drying pads and a soft polishing cloth for the exterior.
A small brush can remove dust from hard-to-reach areas. Cork grease is necessary if the piccolo has cork joints. Lastly, prepare a clean, soft surface to place the disassembled parts.
Avoid using harsh chemicals or abrasive materials that could damage the piccolo’s delicate components.
Disassembling the Piccolo
Begin by carefully removing the headjoint from the body. If present, take off the tenon cap to protect the cork during cleaning.
Gently twist and pull the sections apart, being cautious not to apply excessive force. Place each part on the prepared soft surface to prevent scratches or damage.
For piccolos with keys, avoid touching them unnecessarily to prevent misalignment. If the piccolo has a cork joint, inspect it for wear and apply a thin layer of cork grease if needed.
Remember the orientation of each piece to ensure proper reassembly after cleaning.
Cleaning Process
Proper cleaning is essential for maintaining a piccolo’s performance and longevity. Regular cleaning after each use prevents buildup and protects the instrument’s delicate components.
Cleaning the Body
To clean the piccolo body, use a cleaning rod wrapped in a thin cloth. Gently insert the rod into the body, twisting it to remove moisture and debris. For wooden piccolos, be extra cautious to avoid scratching the interior.
Use a soft brush to clean around the tone holes. Be gentle to avoid damaging the pads.
For deep cleaning, use a specialized piccolo cleaning solution. Apply it sparingly with a cloth, avoiding contact with the pads.
Cleaning the Headjoint
The headjoint requires special attention due to its embouchure hole. Use a headjoint cleaning rod with a soft cloth to remove moisture from the inside.
Clean the embouchure hole with a small brush designed for piccolos. Be careful not to alter its shape or damage the edges.
For metal headjoints, use a polishing cloth to maintain shine. Wooden headjoints should be oiled periodically with bore oil to prevent cracking.
Maintaining the Keys
Wipe the keys with a soft, lint-free cloth after each use to remove fingerprints and moisture. This prevents tarnishing and keeps the mechanism clean.
Apply a small amount of key oil to moving parts every few months. Be careful not to over-oil, as this can attract dust.
Check for loose screws regularly and tighten them gently if needed. If you notice any significant issues with the key mechanism, consult a professional repair technician.
Clean under the keys with thin cleaning paper. Gently press each key and slide the paper between the pad and tone hole to absorb moisture and remove debris.
Aftercare and Storage
Proper reassembly and storage are crucial for maintaining your piccolo’s condition and longevity. These steps protect the instrument from damage and ensure it’s ready for your next performance.
Reassembling the Piccolo
Begin by applying a thin layer of cork grease to the tenon. This helps create an airtight seal and allows for smooth assembly. Gently twist the headjoint into the body, being careful not to force it.
For wooden piccolos, avoid rapid temperature changes. Allow the instrument to acclimate to room temperature before playing or storing. This prevents cracks from forming in the wood.
After reassembly, use a soft cloth to wipe down the exterior, removing any fingerprints or residue. Pay special attention to the keys and mechanisms, ensuring they’re clean and dry.
Proper Storage Techniques
When not in use, store the piccolo in its case. The case provides protection from physical damage and helps regulate humidity. For wooden piccolos, a humidifier in the case can prevent drying and cracking.
Place the piccolo in its designated compartment, ensuring it’s secure and cannot move around. Do not store cleaning accessories inside the case with the instrument, as they can cause damage.
Keep the case in a stable environment, away from direct sunlight and extreme temperatures. Avoid storing in damp areas or near heating vents. If possible, store the case flat rather than upright to prevent stress on the instrument’s joints.