
Adjusting an oboe reed is a crucial skill for any oboist. The reed’s quality significantly impacts tone, intonation, and overall playing experience. Many factors influence reed performance, including humidity, temperature, and playing time.
To adjust an oboe reed, players can squeeze the wire gently to open or close it, or use a reed knife to scrape specific areas of the cane. These techniques allow oboists to fine-tune their reeds for optimal performance. Proper adjustment can transform a stuffy or unresponsive reed into one that produces a rich, resonant tone.
Understanding reed adjustment empowers oboists to maintain consistent sound quality and adapt to changing playing conditions. With practice, musicians develop an intuitive sense of how to modify their reeds quickly and effectively, enhancing their musical expression and technical capabilities.
Understanding the Oboe Reed
Oboe reeds are crucial components that greatly influence tone, intonation, and playability. Their design, construction, and adjustments directly impact an oboist’s performance. Proper understanding of reed anatomy, strength, and responsiveness enables players to make informed adjustments.
Anatomy of an Oboe Reed
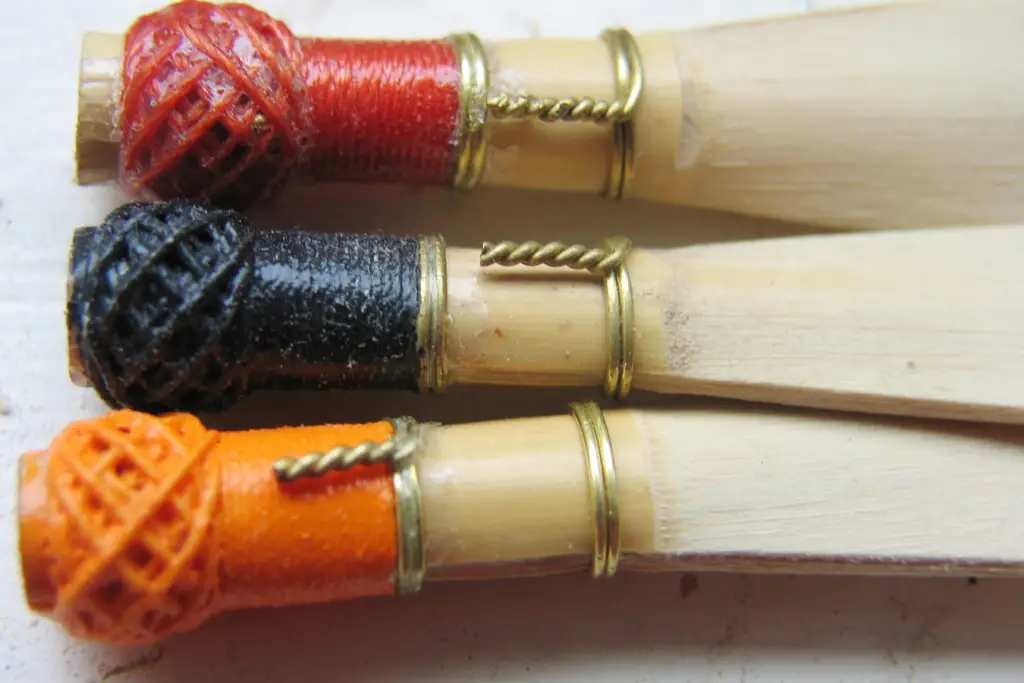
An oboe reed consists of several key parts. The tip is the thinnest section where air enters. The heart, or spine, provides stability and affects pitch. The back connects to the staple, which attaches to the oboe.
The cane used for reeds must be carefully selected and shaped. Reed makers typically use Arundo donax cane, chosen for its resonant properties. The cane is gouged, shaped, and tied onto a metal tube called a staple.
Some reeds include a wire near the base to adjust openness. This wire can be gently squeezed or spread to alter the reed’s responsiveness.
Reed Strength and Responsiveness
Reed strength significantly affects playability and tone quality. A reed’s strength is determined by factors like cane thickness, tip opening, and overall shape.
Softer reeds tend to be more responsive but may lack stability in higher registers. Harder reeds offer more control and projection but require greater air support.
Assessing a reed’s crow is essential for evaluating its strength and responsiveness. A well-balanced reed should produce a clear, in-tune crow with three octaves of C when blown without the oboe.
Factors Affecting Reed Adjustment
Several factors influence reed performance and necessitate adjustments. Climate changes can cause reeds to swell or shrink, affecting their response. Extended playing time gradually softens reeds, requiring occasional tweaks.
Reed construction techniques impact adjustability. Thicker cane allows for more scraping adjustments, while thinner cane limits options.
The basic sound quality of a reed is largely determined by the cane itself. Adjustments can refine this sound within limits, but cannot fundamentally alter poor-quality cane.
Players must consider their own embouchure strength and playing style when adjusting reeds. What works for one oboist may not suit another, making reed adjustment a highly personal process.
Tools and Materials for Adjustment
Proper tools and materials are essential for successful oboe reed adjustments. These items allow for precise modifications to improve the reed’s performance and sound quality.
Mandrel
A mandrel is a crucial tool for oboe reed adjustments. It’s a tapered metal rod that fits inside the reed’s staple. Mandrels come in various sizes to accommodate different reed types.
The mandrel provides stability while working on the reed. It allows for better control and precision during scraping and other adjustments.
High-quality mandrels are typically made of stainless steel or brass. Some feature rubber grips for improved handling.
Reed Knife
The reed knife is a primary tool for making adjustments. It’s used for scraping cane to alter the reed’s thickness and flexibility.
A good reed knife should have a sharp, straight edge. Many oboists prefer double-hollow ground knives for their precision.
Regular sharpening is crucial for maintaining the knife’s effectiveness. A dull knife can damage the reed or lead to inaccurate adjustments.
Some oboists use specialized sharpening stones to maintain their reed knives.
Plaque
A plaque is a thin, flat piece of metal inserted between the reed blades. It protects one blade while working on the other.
Plaques are typically made of blued spring steel. They come in various sizes to fit different reed styles.
Using a plaque prevents accidental cuts to the opposite blade during scraping. It also provides a firm surface for more controlled adjustments.
Some plaques feature a polished surface to minimize friction with the cane.
Cutting Block
A cutting block provides a stable surface for trimming the reed’s tip. It’s usually made of hard, durable materials like ebony or synthetic alternatives.
The block’s smooth, flat surface ensures clean cuts. Some cutting blocks have grooves or markings to guide precise tip shaping.
Using a cutting block helps maintain the reed’s symmetry. It also protects the reed knife’s edge from damage caused by harder surfaces.
Quality cutting blocks are often treated to resist moisture and prevent warping.
Sandpaper
Sandpaper is used for fine-tuning the reed’s response and tone. Different grits serve various purposes in reed adjustment.
Fine-grit sandpaper (400-600 grit) is ideal for smoothing the reed’s surface. It can help improve the reed’s response and reduce unwanted noise.
Coarser grits (200-300) can be used for more aggressive adjustments. They’re useful for quickly removing excess cane or reshaping the reed’s profile.
Wet-dry sandpaper is preferable, as it can be used with water to prevent dust and achieve a smoother finish.
Basic Adjustment Techniques
Adjusting an oboe reed requires precision and careful attention to detail. The following techniques focus on key areas that impact reed performance and playability.
Balancing the Tip
Balancing the tip is crucial for optimal reed function. Start by examining the tip under strong light to identify unevenness or thickness variations.
Use a sharp knife to gently scrape any thicker areas. Work in small increments, frequently testing the reed’s response.
Aim for a balanced, symmetrical tip that allows air to flow evenly through both blades. A well-balanced tip improves response and articulation.
Check for light passing through the tip when held up to a bright source. Even light distribution indicates good balance.
Scraping Strategy
Develop a systematic scraping approach to address specific reed issues. Begin with larger problem areas before refining smaller details.
Focus on the heart, back, and tip areas. Scrape the heart to adjust resistance and tone quality. Work on the back to influence pitch and stability.
Use light, controlled strokes when scraping. Test the reed frequently to avoid over-scraping.
Different scraping patterns affect reed characteristics. Experiment with various techniques to achieve desired results.
Keep track of adjustments made to understand their impact on reed performance.
Tip Clipping
Tip clipping can quickly alter a reed’s response and pitch. Use sharp scissors or a reed clipper for precise cuts.
Start with minimal clipping, removing no more than 0.5mm at a time. Test after each clip to assess changes in playability and intonation.
A shorter tip generally increases resistance and raises pitch. Conversely, a longer tip decreases resistance and lowers pitch.
Consider tip shape when clipping. Maintain a slight curve for optimal response and tone quality.
Wire Adjustment
For reeds with wires, proper adjustment can significantly impact performance. Begin by soaking the reed briefly to prevent cracking.
To open the reed, gently squeeze the wire with your fingers. This increases airflow and can brighten the tone.
Closing the reed involves pinching the sides of the wire. This action increases resistance and can darken the tone.
Make small adjustments and test frequently. Wire position affects the reed’s overall shape and response.
Ensure the wire remains perpendicular to the reed’s center line for balanced performance.
Refining the Reed
Refining an oboe reed requires careful adjustments to achieve optimal sound and playability. The process involves controlling vibrations, modifying key areas of the reed, and iterative testing.
Controlling Vibrations
Adjusting oboe reeds often starts with addressing vibration issues. Players can gently squeeze the sides of the reed to increase resistance or carefully separate the blades to decrease resistance.
For reeds that are too closed, inserting a small piece of metal or plastic between the blades can help open them. This technique should be applied cautiously to avoid damaging the delicate cane.
Scraping the tip of the reed can improve response and ease of play. A sharp knife or specialized reed tool is used for precise scraping, focusing on thinning the tip evenly across its width.
Adjusting the Heart and Back
The heart and back of the reed significantly influence its overall performance. Scraping the heart area can lower pitch and increase flexibility, but overdoing it may compromise stability.
To adjust the back, players can use fine sandpaper to thin the bark slightly. This can help with response in the low register and overall reed flexibility.
Balancing both sides of the reed is crucial. Uneven scraping can lead to inconsistent tone and response. Players should aim for symmetry in thickness and shape across the reed’s entire surface.
Testing and Adjustment Cycle
The reed adjustment process is iterative, requiring frequent testing and refinement. Players should test the reed after each adjustment, paying attention to intonation, response, and tone quality across all registers.
Crow testing is an essential technique. A well-adjusted reed should produce a clear, stable crow at concert pitch C. If the crow is flat, further scraping at the tip may be necessary. If sharp, attention to the heart area might be required.
Players should also test articulation, dynamics, and overall comfort while playing. Small adjustments can have significant impacts, so patience and careful listening are key throughout the refining process.
Troubleshooting Common Reed Problems
Oboe reed issues can significantly impact sound quality and playability. Identifying and addressing these problems is crucial for optimal performance.
Warped Reeds
Warped reeds often result from improper storage or exposure to moisture changes. To fix a warped reed, soak it in water for 1-2 minutes. Gently flatten the reed between two smooth surfaces, like glass plates. Apply light pressure for 30 seconds.
If the warp persists, use a reed adjusting plaque to reshape the reed. Insert the plaque between the blades and carefully bend them back into alignment.
For severe warping, consider steaming the reed. Hold it over boiling water for a few seconds, then reshape it. Be cautious, as excessive heat can damage the cane.
Leaking Sides
Leaking sides can cause airy tone and poor response. To identify leaks, hold the reed up to a light source. Look for gaps along the sides where light shines through.
To fix leaks, rewrap the thread tightly around the tube. Start at the bottom and work your way up, overlapping each wrap slightly. Secure the thread with beeswax or nail polish.
If rewrapping doesn’t solve the issue, the reed may need to be recut. Use a sharp knife to trim a thin layer from each side, ensuring they meet evenly.
Closed Tip
A closed tip restricts airflow and can make the reed unresponsive. To open the tip, gently squeeze the sides of the reed near the wire (if present) using your fingers.
For reeds without a wire, carefully insert a small plaque or knife between the blades at the tip. Gently separate them to create a small opening.
Be cautious not to open the tip too much, as this can cause the reed to be flat and unstable. Check the crow after each adjustment to ensure proper pitch and response.
Crow Adjustment
The crow is the sound produced when blowing into the reed without the oboe. A proper crow indicates good pitch and response.
To adjust the crow:
- Soak the reed for 30-60 seconds
- Blow into the reed, listening for a clear “C” pitch
- If the pitch is flat, carefully scrape small amounts of cane from the back of the reed
- If the pitch is sharp, try opening the tip slightly
Use a reed knife to make precise adjustments. Focus on small, incremental changes and test frequently. Aim for a stable, resonant crow that produces three octaves of “C” when blown with increasing air pressure.
Maintenance and Care
Proper maintenance and care are crucial for preserving the quality and longevity of oboe reeds. Regular attention to moisture, rotation, cleaning, and storage practices ensures optimal reed performance and extends their usable life.
Moisture Management
Blow excess moisture from the reed after playing. This prevents water accumulation that can lead to warping or mold growth. Gently tap the reed on a soft surface to remove droplets.
Use a reed case with proper ventilation. Avoid airtight containers that trap moisture and promote mold. Choose cases with individual slots to prevent reeds from touching each other.
Allow reeds to dry completely between uses. Place them in a well-ventilated area away from direct sunlight or heat sources. Avoid storing wet reeds in closed cases.
Consider using a reed drying stand or holder. These tools promote airflow around the reed, speeding up the drying process and maintaining reed shape.
Reed Rotation
Implement a reed rotation system. Use multiple reeds in rotation to prevent overuse and extend their lifespan. This practice allows each reed time to rest and recover between playing sessions.
Number or color-code reeds for easy tracking. Keep a log of usage to ensure even rotation. Aim to have 3-5 playable reeds in rotation at any given time.
Evaluate reed condition regularly. Retire reeds that show signs of wear, splitting, or decreased playing quality. Introduce new reeds into the rotation gradually, allowing them to break in alongside seasoned reeds.
Sanitization
Clean reeds regularly to remove saliva and debris. Use a gentle antiseptic solution specifically designed for woodwind instruments. Avoid harsh chemicals that may damage the cane.
Soak reeds briefly in the cleaning solution, then rinse thoroughly with clean water. Gently brush the reed with a soft-bristled toothbrush if necessary.
Allow reeds to dry completely after cleaning. Place them on a clean, lint-free cloth or reed holder. Avoid handling the tip of the reed during the cleaning process.
Sanitize reed cases periodically. Wipe them with a mild disinfectant and allow to air dry completely before replacing reeds.
Long-Term Storage
For extended periods of non-use, store reeds in a cool, dry place. Avoid areas with high humidity or temperature fluctuations that can cause warping or mold growth.
Use silica gel packets in reed cases to absorb excess moisture. Replace these packets regularly to maintain their effectiveness.
Check stored reeds periodically for signs of mold or damage. Discard any reeds that show visible issues. Rotate stored reeds occasionally to prevent settling or warping.
Consider using a reed storage box with controlled humidity. These specialized containers help maintain optimal moisture levels for long-term reed preservation.
Practice and Patience
Adjusting oboe reeds requires developing fine motor skills and a keen ear. Regular practice and meticulous record-keeping are essential for mastering this delicate art.
Developing Sensitivity
Adjusting oboe reeds demands a high level of sensitivity in both touch and hearing. Musicians should start by practicing on old reeds to gain confidence without risking valuable materials.
Regular scraping exercises help develop finger control and precision. Oboe players can begin with small, gentle strokes, gradually increasing pressure and complexity as their skills improve.
Listening skills are equally crucial. Musicians should practice crowing reeds to recognize subtle changes in pitch and timbre. This helps in understanding how different adjustments affect the reed’s performance.
Adjustment Record Keeping
Maintaining detailed records of reed adjustments is vital for consistent improvement. Players should note the date, specific changes made, and the resulting effects on the reed’s performance.
A simple table format can be used:
| Date | Adjustment | Result |
|---|---|---|
| 11/20/24 | Thinned tip | Increased response |
| 11/21/24 | Shortened back | Lowered pitch |
This systematic approach allows musicians to track their progress and identify patterns in successful adjustments. It also helps in replicating positive results and avoiding repeated mistakes.
Over time, these records become a valuable resource, enabling players to make more informed decisions when adjusting future reeds.